posted on Thursday, November 1st, 2012
Replication enables data from one MySQL database server (the master) to be replicated to one or more MySQL database servers (the slaves). Replication is asynchronous by default – slaves need not to connected permanently to receive updates from the master. This means that updates can occur over long-distance connections and even over temporary or intermittent connections such as a dial-up service. Depending on the configuration, you can replicate all databases, selected databases, or even selected tables within a database.
Database replication requires at least two machines both with MySQL server running and likewise networked properly (machines can see/ping one another in a network). These machines will be referred to as Master and Slave/s; the Master server having the original database, and the Slave server/s replicating or copying the original database.
For our purpose, I have set up two MySQL servers in my local machine: MySQL 5.5 using port 3309 and MySQL 5.1 at port 3312. We will implement database replication using MySQL Workbench 5.2.41 CE. MySQL 5.5 will be my Master server and MySQL 5.1 will be the Slave server, and the database to replicate is “pop”. The machine is running a Windows 7 64 bit operating system.
Note:
The replication in this tutorial is done mainly using the MySQL Workbench, therefore it is necessary to run the MySQL Workbench as administrator.
Preparing your MySQL servers
Before you begin configuring your Master and Slave, make sure you have the same database in each server:
- Disconnect your Master server to any applications using the database to be replicated to avoid any changes
- Restore the database to be replicated in your Slave server making sure you have a perfect copy of the original database in your Master server (LOAD DATA FROM MASTER command has been deprecated as of MySQL 4.1 and removed in MySQL 5.5)
Setting up the Master server
Run your MySQL Workbench as administrator. Manage the Database server instance (MySQL 5.5) at localhost 3309 and update your configuration for log-bin, and binlog-do-db under “Log Files” tab, then go to “Replication” tab and set server-id=1. Press “Apply” button and the dialog below will be displayed.
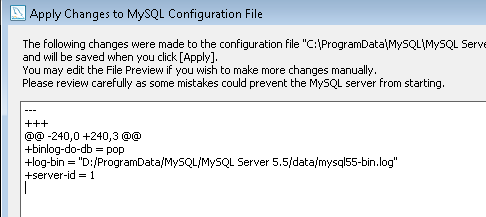
New Master server settings:
binlog-do-db=pop
server-id=1
Press “Apply” button in dialog then restart your Master server.
Note:
- If you omit server-id (or set it explicitly to its default value of 0), a master refuses connections from all slaves.
- For the greatest possible durability and consistency in a replication setup using InnoDB with transactions, you should use innodb_flush_log_at_trx_commit=1 and sync_binlog=1 in the master configuration file.
- Ensure that the skip-networking option is not enabled on your replication master. If networking has been disabled, your slave will not able to communicate with the master and replication will fail.
We then create a user with replication privileges. Go to “User and Privileges” then click “Add Account”. For our example set user name as “replication_user” and provide corresponding password under “Login” tab. Finally set under “Administrative Roles” the account as ReplicationAdmin. Click “apply” button to add the new user account.
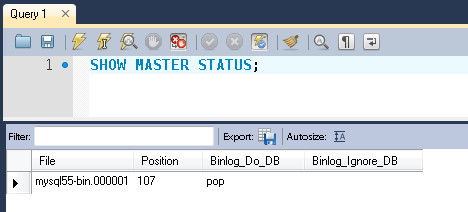
To make sure we have configured the Master server properly, we can verify the status with the following command:
Configuring the Slave server
Run your MySQL Workbench as administrator. Manage the Database server instance (MySQL 5.1) at localhost 3312 and go to “Replication” tab and set server-id=2 and replicate-do-db with the same value as the Master server binlog-do-db configuration. Press “Apply” button and the dialog below will be displayed.
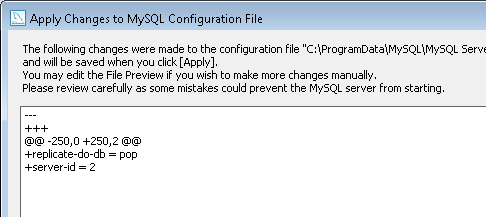
New Slave server settings:
replicate-do-db=pop
Press “Apply” button in dialog then restart your Slave server.
At this moment your Slave server is not yet operational. You need a couple of commands to run before you can start your Slave server from reading and replicating the database from your Master server.
Run the following command in your SQL Editor before you can send CHANGE MASTER command:
Issue the following commands on your SQL Editor:
MASTER_HOST=’LOCALHOST’,
MASTER_USER=’replication_user’,
MASTER_PASSWORD=’p@ssw0rd’,
MASTER_PORT=3309,
MASTER_LOG_FILE=’mysql55-bin.000001′,
MASTER_LOG_POS=107,
MASTER_CONNECT_RETRY=60;
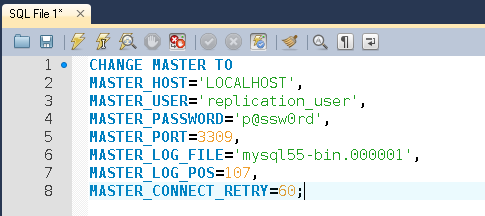
Where MASTER_LOG_FILE and MASTER_LOG_POS is the file and position seen in SHOW MASTER STATUS respectively. The user and password is the account created in the Master server as the ReplicationAdmin. And the host and port corresponds to the Master server host and port.
Finally start your Slave server with the following command, again using your SQL Editor:
To check Slave status, issue the command SHOW SLAVE STATUS in your SQL Editor:
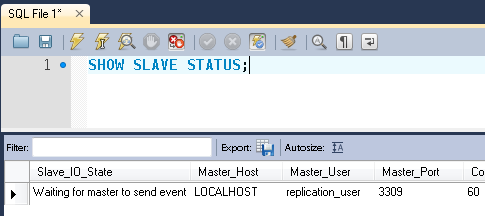
The following details can be seen in Slave status as an indication that the replication is now up and running.
Slave_SQL_Running = Yes
You’re done. You now have database replication up and running. Congratulations.
Posted on Thursday, November 1st, 2012 at 2:05 pm Print this Article Email this Article